how to make bullet points in google slides
Bullet points are one of the fastest ways to make a Google Slides presentation easier to read. They break long text into short ideas, keep a slide from looking crowded, and give your audience something they can scan while you speak. This guide covers the toolbar, the Format menu, shortcuts, sub-bullets, custom bullets, spacing, and common fixes.
Quick Answer
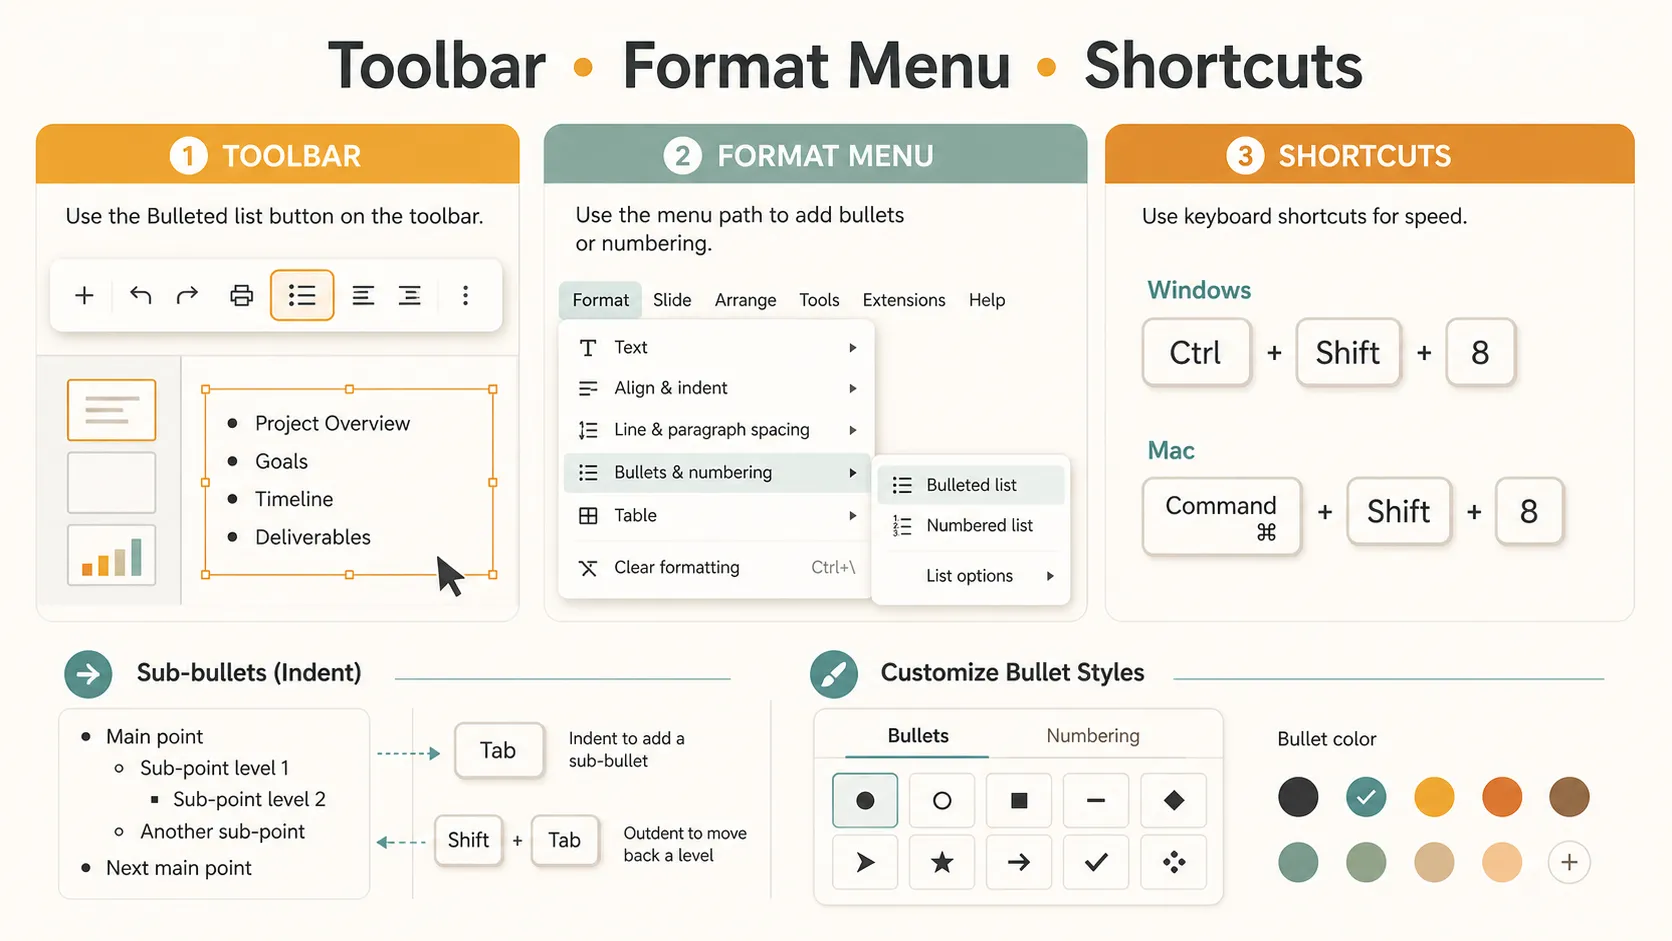
To make bullet points in Google Slides, click inside a text box, then click the Bulleted list button in the toolbar. If you do not see it, open More on the toolbar. You can also use Format > Bullets and numbering > Bulleted list. Google's help page on adding numbered and bulleted lists also notes that Tab can create a list inside a list.
For speed, use the shortcut:
- Windows or ChromeOS: Ctrl + Shift + 8
- Mac: Command + Shift + 8
For a numbered list, use Ctrl + Shift + 7 on Windows or ChromeOS, and Command + Shift + 7 on Mac. Google lists these in its official Google Slides keyboard shortcuts guide.
How to Make Bullet Points in Google Slides
Google’s official guide to adding bulleted lists explains that you can add and customize bulleted or numbered lists in Google Docs and Slides. It also notes that pressing Tab can create a list inside a list.
| Task | How to do it in Google Slides |
|---|---|
| Make bullet points in Google Slides | Click inside a text box, then select Bulleted list |
| Make a numbered list | Select Numbered list instead |
| Create sub-bullets | Press Tab on a bullet line |
| Move back to the main level | Press Shift + Tab |
| Change bullet style | Use Format > Bullets and numbering > List options |
| Fix crowded bullets | Shorten the text, adjust spacing, or split the slide |
Method 1: Use The Toolbar
1. Open your presentation in Google Slides. 2. Click the slide where you want the bullet points. 3. Click inside an existing text box, or go to Insert > Text box and draw a new one. 4. Click the Bulleted list button in the toolbar. 5. Type your first bullet point. 6. Press Enter to add the next bullet. 7. Press Enter twice when you want to stop the list.
If the Bulleted list button is not visible, your browser window may be too narrow. Open More to find additional formatting tools.
Method 2: Use The Format Menu
The Format menu is useful when the toolbar button is hidden or when you are cleaning up existing text.
1. Click inside the text box.
2. Highlight the lines you want to turn into bullets.
3. Click Format in the top menu.
4. Choose Bullets and numbering.
5. Select Bulleted list.
Use this method when someone pasted a paragraph into a slide. Split the paragraph into short lines, highlight them, and turn them into bullets all at once.
Method 3: Use Keyboard Shortcuts
Shortcuts are the fastest option once you remember them. Click inside a text box and use Ctrl + Shift + 8 on Windows or ChromeOS. On Mac, use Command + Shift + 8.
To make a numbered list instead, use Ctrl + Shift + 7 on Windows or ChromeOS, or Command + Shift + 7 on Mac.
If a shortcut does not work, check that your cursor is inside a text box. Keyboard language and browser shortcut conflicts can also get in the way, so the toolbar and menu are good backups.
How To Make Sub-Bullets
Sub-bullets are useful when one main point needs supporting details. Place your cursor on a bullet line, then press Tab. To move it back to the main level, press Shift + Tab.
Example structure:
- Main idea
- Main idea
- Supporting detail
- Supporting detail
- Main idea
Use sub-bullets carefully. One main level and one sub-level are usually enough.
How To Change Bullet Style
You can change the bullet symbol if the default dot does not fit your slide.
1. Select the bullet points you want to change.
2. Click Format.
3. Choose Bullets and numbering.
4. Open List options.
5. Choose a different bullet style, or select More bullets if available.
This is useful for checkmark-style lists, process slides, feature lists, or more visual decks. Keep it simple. A clean dot, dash, checkmark, or small marker usually works better than a decorative symbol. If the bullet needs a different color, select the list or click the bullet marker, then use the text color control. Google's help on changing list type and color explains that list markers can be formatted too.
How To Adjust Indents And Spacing
Sometimes the bullet points are technically correct, but the slide still looks off. The list may sit too far to the right, feel cramped, or wrap badly. For indentation, use the ruler if it is visible, or adjust list level with Tab and Shift + Tab. For line spacing, select the list and use the line spacing controls. Google also has a help page on paragraph and font formatting.
A good slide list usually follows a few simple rules:
- Keep each bullet short.
- Use the same grammar pattern across the list.
- Do not use more than five or six bullets on one slide unless it is a reference slide.
If the slide feels crowded, split the list across two slides or turn the content into a simple visual layout.
Common Bullet Point Problems
| Problem | Likely cause | Quick fix |
|---|---|---|
| Bullet button is missing | Toolbar is collapsed | Click More or use the Format menu |
| Bullets appear in the wrong place | Cursor is outside the text box | Click inside the text box first |
| Sub-bullets will not work | The text is not in list mode | Turn on bullets, then press Tab |
| Text wraps badly | Indent or text box is too narrow | Widen the text box or adjust indent |
| List looks too dense | Too many items | Split the list or shorten each point |
When Bullet Points Are Not Enough

Bullet points are useful, but they are not always the final answer. A slide with six bullets may be clear as notes, but still feel flat in a presentation. If you are turning an article, report, class reading, meeting summary, or rough outline into a deck, the bigger job is deciding what becomes a slide, what becomes a visual, and what should be left out.
That is where Pi can fit naturally into the workflow. You can take a bullet outline or a block of source material and use Pi to turn it into a structured presentation. Instead of starting with a blank deck, you can freely generate a theme, customize the style and colors, reuse ready-made components, and let Pi handle much of the layout work.
This is helpful when your bullets already contain the right ideas, but the deck still needs shape. Pi can organize points into sections, choose cleaner slide structures, bring in icons from an icon library, and use AI-generated images when the topic needs stronger visuals. You still review the content, but you are not dragging every text box, icon, and image into place by hand.
The Verdict
Making bullet points in Google Slides is simple once you know the three main routes: the toolbar, the Format menu, and keyboard shortcuts. The harder part is deciding how many bullets belong on a slide and whether the list should stay as text at all. Clear bullet points are short, consistent, and easy to scan.
The better question is how to use bullets well. Clear bullet points are short, consistent, and easy to scan. If a slide has too many bullets, split the content, simplify the wording, or turn the ideas into a more visual layout.
Frequently Asked Questions (FAQ)
How do I make bullet points in Google Slides?
Click inside a text box, then click the Bulleted list button in the toolbar. You can also use Format > Bullets and numbering > Bulleted list.
What is the shortcut for bullet points in Google Slides?
Use Ctrl + Shift + 8 on Windows or ChromeOS. On Mac, use Command + Shift + 8.
How do I make sub-bullets in Google Slides?
Put your cursor on a bullet line and press Tab. To move it back to the main level, press Shift + Tab.
Can Pi turn bullet points into a presentation?
Yes. Pi can turn bullet points, notes, or article content into a structured deck with themes, custom styles, components, icons, layout help, and AI-generated visuals.